Check this out


Autocad Tutorials, Autocad 3D, Free Autocad Blocks

Autocad Tutorials, Autocad 3D, Free Autocad Blocks

Providing Base Points

Providing Base Points
When you move or copy objects, AutoCAD prompts you for a base point, which is a difficult concept
to grasp. AutoCAD must be told specifically from where and to where the move occurs. The base point
is the exact location from which you determine the distance and direction of the move. After the base
point is determined, you can tell AutoCAD where to move the object in relation to that point.
Follow these steps to practice using base points:
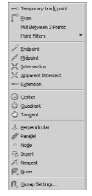
1. To select a base point, hold down the Shift key, and right-click. A menu appears, displaying
the Object Snap (Osnap) options.


WARNING When you right-click the mouse, make sure the cursor is within the AutoCAD drawing
area; otherwise, you won’t get the results described in this book.
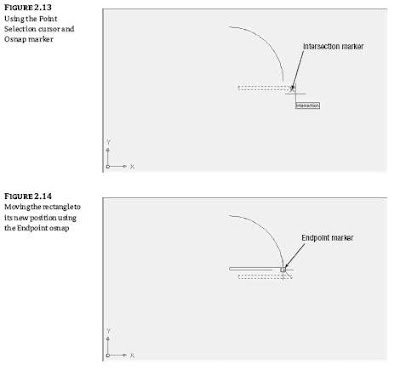
2. Choose Intersection from the Osnap menu. The Osnap menu closes.
3. Move the cursor to the lower-right corner of the door. Notice that as you approach the
corner, a small x-shaped graphic appears on the corner. This is called an Osnap marker.
4. After the x-shaped marker appears, hold the mouse motionless for a second or two. A Tool-
Tip appears, telling you the current Osnap point AutoCAD has selected.
5. Click the left mouse button to select the intersection indicated by the Osnap marker. Whenever
you see the Osnap marker at the point you want to select, you don’t have to point
exactly at the location with your cursor. Just left-click the mouse to select the exact Osnap
point (see Figure 2.13). In this case, you selected the exact intersection of two lines.
6. At the Specify second point of displacement or :
prompt, hold down the Shift key, and click the right mouse button again. You’ll use the Endpoint
osnap this time, but instead of clicking the option with the mouse, type E↵.
7. Pick the lower-right end of the arc you drew earlier. (Remember that you only need to move
your cursor close to the endpoint until the Osnap marker appears.) The door moves so that
the corner of the door connects exactly with the endpoint of the arc (see Figure 2.14).
As you can see, the osnap options let you select specific points on an object. You used Endpoint
and Intersection in this exercise, but other options are available. Chapter 3 discusses
some of the other osnap options. You may have also noticed that the Osnap marker is different
for each of the options you used. You’ll learn more about osnaps in Chapter 3. Now, let’s continue
with our look at point selection.


TIP You may have noticed the statement Use first point as displacement in the prompt
in step 6. This means that if you press ↵ instead of clicking a point, the object will move a distance
based on the coordinates of the point you selected as a base point. If, for example, the
point you click for the base point is at coordinate 2,4, the object will move 2 units in the X axis
and 4 in the Y axis.
If you want to specify an exact distance and direction by typing a value, select any point on the
screen as a base point. Or, you can type @ followed by ↵ at the base point prompt; then, enter the second
point’s location in relative coordinates. Remember that @ means the last point selected. In the
next exercise, you’ll try moving the entire door an exact distance of 1 unit at a 45° angle. Metric users
will move the door 3 units at a 45° angle. Here are the steps:
1. Click the Move tool on the 2D Draw control panel.
2. Type P↵. The set of objects you selected in the previous exercise is highlighted. P is a selection
option that selects the previously selected set of objects.


3. You’re still in Object Selection mode, so click the arc to include it in the set of selected objects.
The entire door, including the arc, is highlighted.
4. Press ↵ to tell AutoCAD that you’ve finished your selection. The cursor changes to Point
Selection mode.
5. At the Specify base point or [Displacement] : prompt, choose a
point on the screen between the door and the left side of the screen (see Figure 2.15).


6. Move the cursor around slowly, and notice that the door moves as if the base point you
selected were attached to the door. The door moves with the cursor, at a fixed distance from
it. This demonstrates how the base point relates to the objects you select.
7. Type @1<45↵. (Metric users should type @3<45↵.) The door moves to a new location on the
screen at a distance of 1 unit (3 for metric users) from its previous location and at an angle
of 45°.
TIP If AutoCAD is waiting for a command, you can repeat the last command used by pressing
the spacebar or pressing ↵. You can also right-click in the drawing area and select the option
at the top of the list. If you right-click the Command window, a shortcut menu offers the
most recent commands.
This exercise illustrates that the base point doesn’t have to be on the object you’re manipulating;
it can be virtually anywhere on your drawing. You also saw how to reselect a group of objects that
were selected previously without having to duplicate the selection process.